


Stereoscopic Highlighting of 2D Images
Brief description of a method used to adapt 2D images to stereocopy
---
Stéphane Comparetti
Research & Development Director, Executive Toon Services
| Introduction |
Being involved for a long time in the computer graphics image, I often faced difficulties on this technology to re-create atmospheres which are comparable to the drawing of artists.
On a static picture, the drawing provides more artistic freedom than the CGI can do, while being more economical.
Unfortunately, as soon as there is movement or stereo highlight, the 2D drawing no longer works.
The amazingly rich design of the 2D animation movie "the suicide shop" by Patrice Leconte and the sub optional request of stereoscpy required the establishment of a stereoscopic solution that would respect the drawings of the artists. It was indeed out of the question to use the camera mapping technique, which would, among other things would have brought a restriction on the very free2D drawings perspectives.
This film brought me the opportunity to find an original solution in order to solve these problems.
This article is the presentation of that.
| The Approach |
Depth perception is obtained by the simultaneous vision of two separate images (one for each eye). The starting point of my reflection has been to consider that the image for the left eye could undergo no modification (it will be made as if it were a movie without stereoscopy). Thus, only the image for the right eye would carry up a set of transformation to produce depth perception.
This constraint has the main advantage of not disturbing the original appearance of the image.
I then selected several complementary methods to modify the image for the right eye (which I call "the right image" in this document).
Prerequisite: Principle of calculating changes in the right image
Let's consider a point Pg (x, y) in the left image. Its corresponding position in the right image - Pd (x, y) - can be calculated from the moment you assign it a depth information (corresponding to the distance to the observer) which we call here Pg (z). The corresponding position Pd(x, y) will be a lateral displacement of the point Pg (x, y, z).
Since we are not using any camera, the concepts of focal length, eye separation and convergence distance (classic stereoscopic parameters) will be simulated by the use of constants when calculating the displacement between Pg (x, y, z) and Pd (x, y).
Note: The lateral movement may be towards the right if the point is gushing (located between the viewer and the projection screen) or to the left if it is behind the screen.
Method 1: Systematization of the multiplane method in the composition of scenes
On traditional animations (2D cartoon animation), a scene is constructed from cells witch consists of image files representing distinct elements of the scene. Ex: background, elements of decor in the foreground, character ...
In this type of animation, it may be necessary to place these
elements at different depths. (This technique, known as "multiplan
animation" is usually used to give more depth to the camera movements)
In
this configuration, the right image can then be constructed by shifting
laterally each element of the scene (or cell) according to its depth.
The calculation of this shift will be done by the method indicated above.
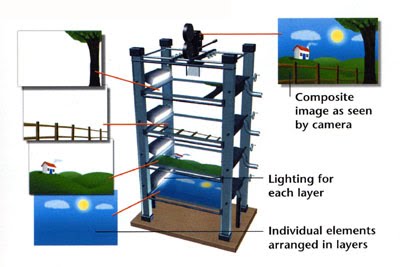 | 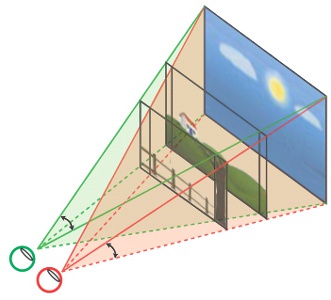 |
| Principle of conventional multiplane. The cells are positioned at different distances from the camera. | Adaptation of the multiplane stereo vision. We see here that the cells are seen by the right eye with an lateral shift proportional to their distance from the observer |
The result gives an impression of planar elements at different depths, like a pop-up book.
However
this method is inefficient when it comes to showing the depth
perspective of elements representing inclined planes like the floor or
side walls.
Method 2: Deformation of cells to simulate a tilt
This second solution (which naturally complements the first)
consists on setting different values of depth on the corners of a given
element (or cell) to indicate an inclination (for example
on the soil or on sidewall).
From this information, the
software will calculate the deformations to be applied on the cell to
match that should be seen by the right eye.
This technique will produce a correct stereoscopic representation of the inclined planes contained in the scene.
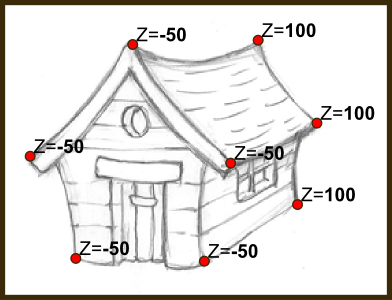
Method 3: Deformation of cells for representing a complex or angular volume
The third solution (which is an optimization of the 2nd) will be to
position on a given element (for example: a building) depth information
on key points of the image.
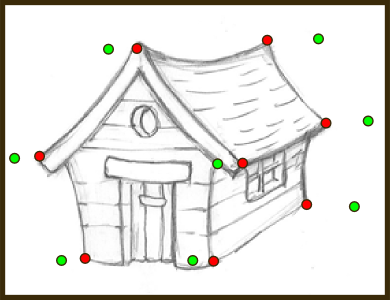
Specifically, we will place depth points
at the corners of a building, at the corner of a window, or even the
corners of a room in the case of interior background.
The deformation of the cell will take place then after recalculating new lateral positions of these points of depth applied to theright image.
This technique will help add volume to any element of geometric nature as a building, a door, a crate, inside a room, a hallway ... but also to rounded shapes (ball, column) provided to increase the number of depth points.
 |
 |
 |
|
Placement of depth points on the cell.
|
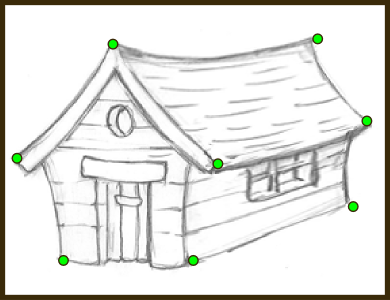
Green: new positions of these points calculated according to their Z value.
|
Cell after digital transformation, now adapted to the perspective of the right image. |
Camera movements
As part of a drawing, framing is imposed by the drawing.
This raises the problem of changing frame (the case of camera movement in the cartoon).
One
possible solution is then to recalculate the position of each cell (as
is already the case in a conventional multiplane) for this new
framework and apply this same method to depth points.
We will then
have a very realistic rendering of movement, similar to what could have
been obtained by the method of "mapping camera"used in the CGI
softwares.
| Editing tool |
The application of this stereoscopic technique on a 2D scene
can be quite difficult without a tool for viewing and editing
appropriate.
Contrary to an C.G.I scene where the elements are designed with their volume and are positioned in a 3-dimensional space, we must here give to elements drawn as flat objects some depth information (or distance to the camera) without any objective benchmarks.
This relatively simple task as long as it is used to separate the cells from each other on different Z planes, becomes virtually impossible (without a special tool) when it comes to place inclined cells or distorted cells in relation to each other.
For example, without an appropriate visualization tool, the proper representation of a man standing vertically on a flat floor (which is an inclined cell) becomes a complex task. The result of poor positioning will bring that character to appear (in stereoscopic vision) like if he is levitating above the ground or buried in the ground.
The adopted solution allowed me to create a visualization tool that displays items from the scene in 3D space according to their depth information.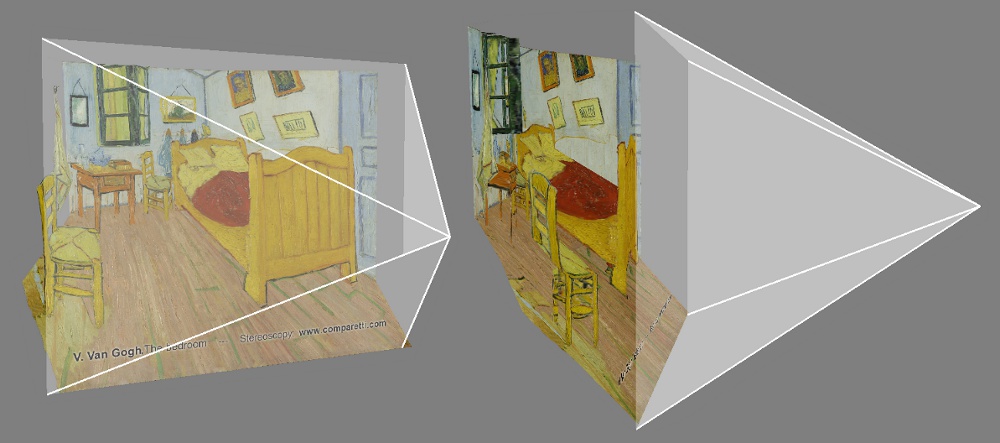
By rotating the 3D view perspective, the operator can easily calibrate properly the elements in depth so that they coincide exactly with each other.
I wish to state here that this 3 dimensional representation is only for the editing purpose of the scene and takes no part in the method of calculating and manipulating images. As a reminder, the calculation of the right image is performed only by lateral movement and warping of cells (themselves in 2D).
| Conclusions |
Peculiarities of this method
A drawing contains natural perspective information and we soon realize that there is not much to be done to witness magic...
Indeed, some main elements put into perspective through this technique are sufficient to give the viewer the impression of depth, and contrary to 3D C.G.I, it is the drawing itself, by the effect of natural perspective, its shadows and lights, which will make it all work.
Moreover, it appears that these 2D stereoscopic images are less visually straining for the viewer than 3D cgi images.
Benefits
- Fidelity to the original drawing.
- Integration into a chain of conventional 2D manufacturing (work from 2D layout and bg - the highlighting technique being performed in the pre-compositing process)
- Cost of stereoscopic enhancement much lower than using a cgi process.
Finally, thanks to this method, 2D animation finds a new life by accessing at last to the world of stereoscopy.
English translation: thanks to Laurent Lafontant & Naomi Nakashima
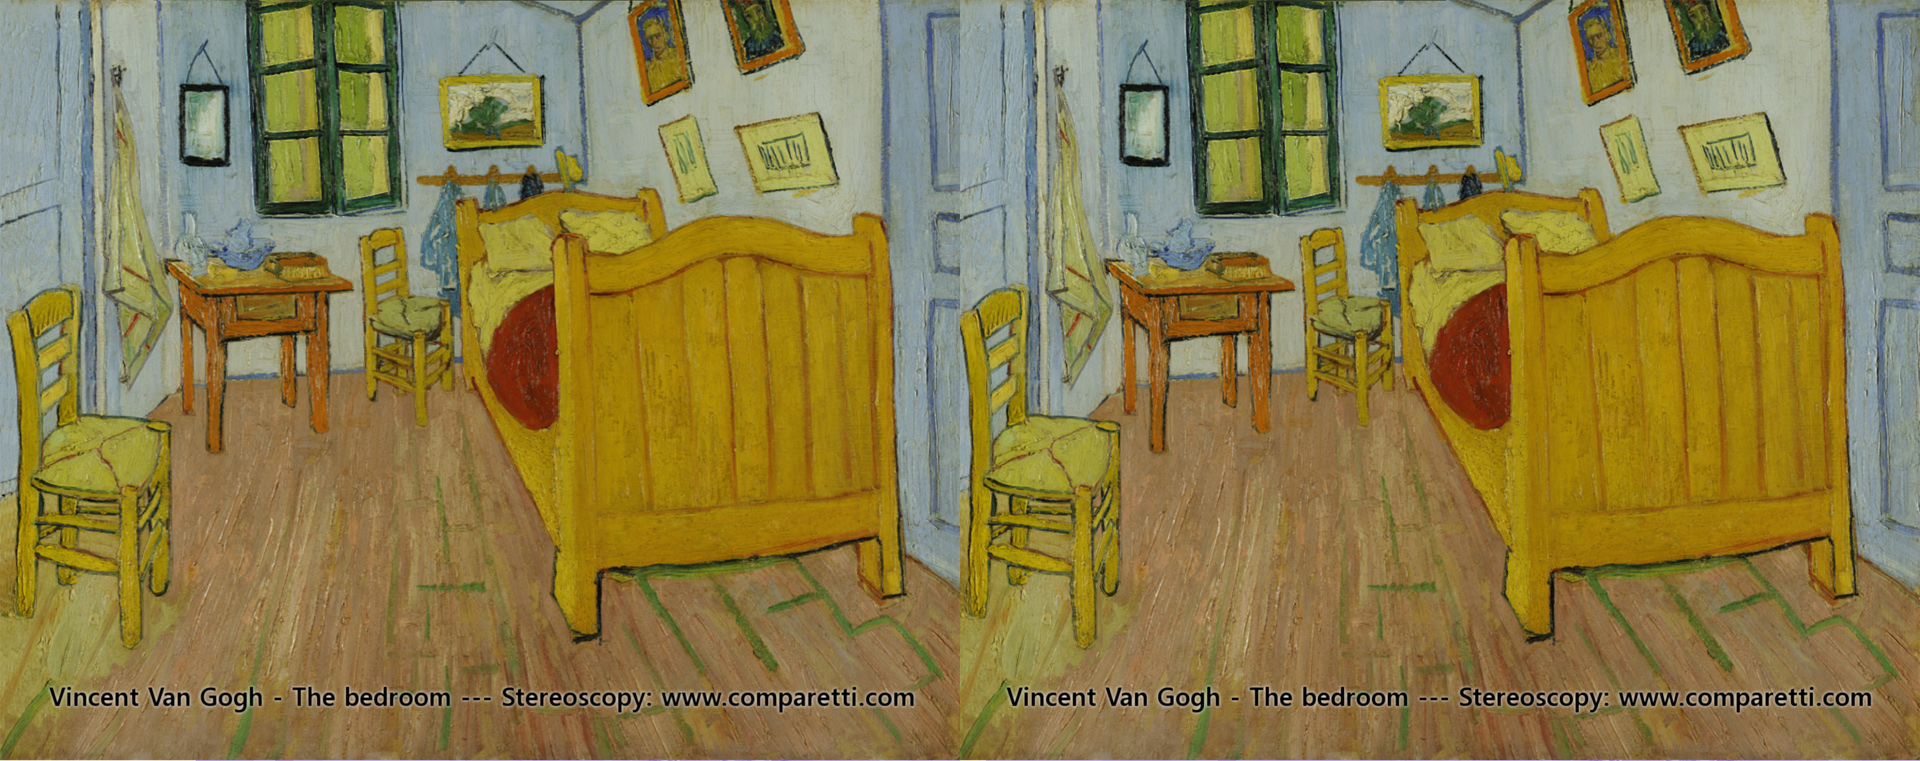
| Sample Stereoscopic Images |
Click Here ...
| Contact : stephane@comparetti.com |